

Contents
Try Periskope
Manage WhatsApp Groups, Chats and Numbers at Scale
Your Periskope AI Agent Can Now Take Action, Not Just Respond
Your Periskope AI Agent Can Now Take Action, Not Just Respond
Your Periskope AI Agent Can Now Take Action, Not Just Respond
Anjali Pandey
It’s Day 4 of Periskope Launch Week, and today we're rolling out one of the most requested AI updates yet.
→ Control what your AI does, connect it to your own tools and data, and see exactly what it's doing in real time.
With this update, your AI Agent can take action, fetch live data from your CRM, your order system, your support database, and do things on your behalf, automatically, without your team having to step in.
✅ Built-in Tools that let you control exactly how your AI operates in conversations
✅ Custom Tools that let you connect your AI to your own APIs, databases, and external services
✅ AI Logs so you always know exactly what your AI did, what it called, and why
1. Built-in Tools: Choose How Your AI Operates
Every team works differently. Some want their AI responding to customers. Others want their AI to create tickets or drop private notes without it ever responding to customers.
Now you can set it up exactly the way your team operates. Head to AI > Tools > Built-in Tools to configure these.
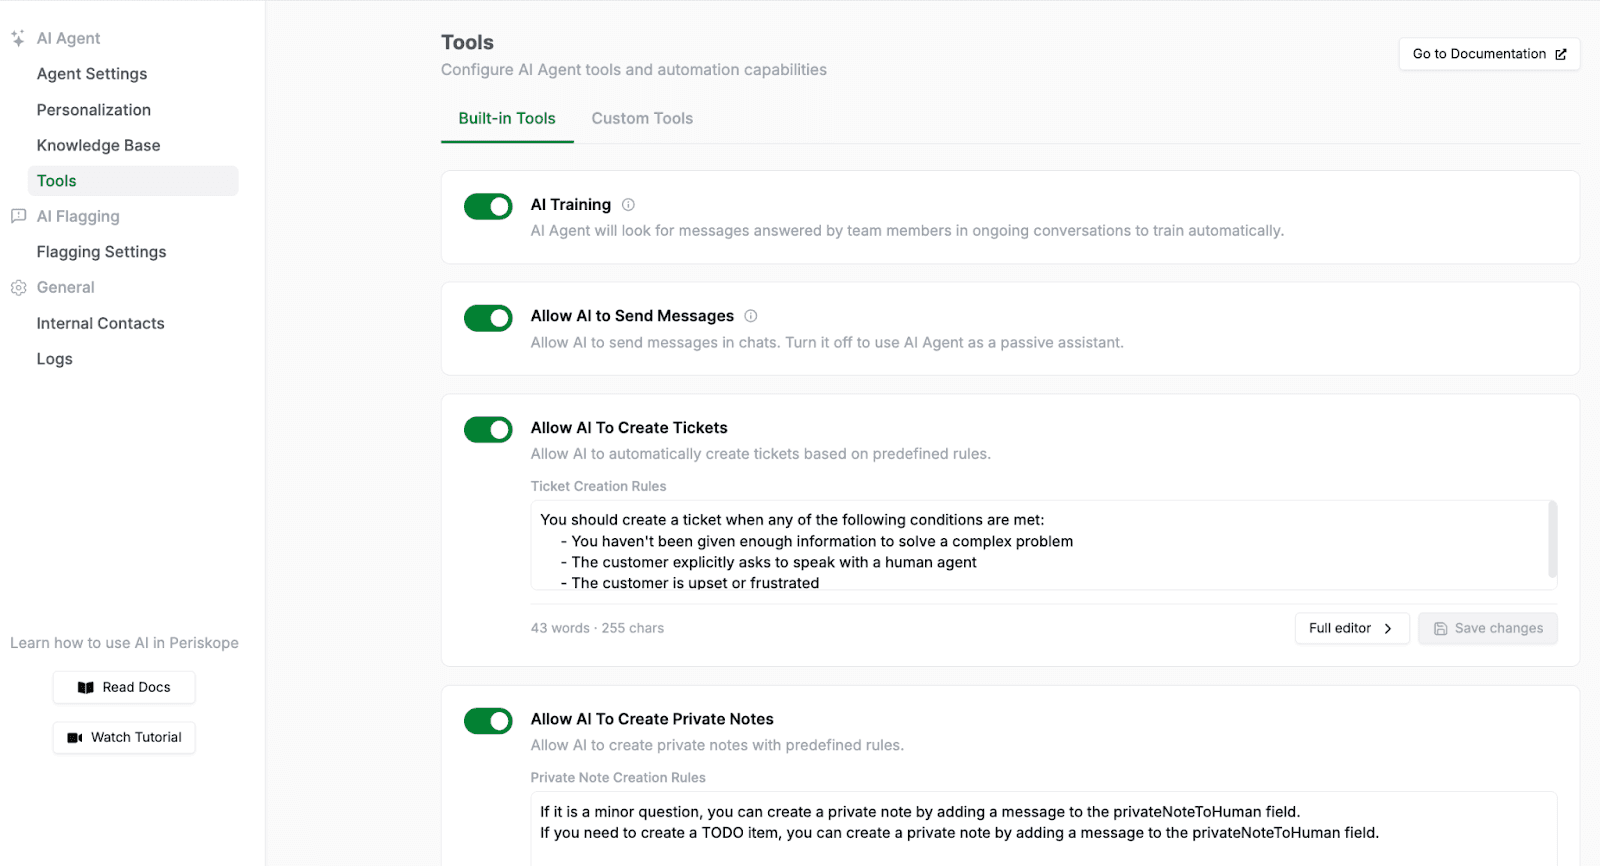
Allow AI to Send Messages: Turn this on, and your AI responds to customers directly. Turn it off and your AI works silently in the background, handling everything behind the scenes while your team manages the conversation.
Allow AI to Create Tickets: Your AI raises and routes tickets automatically based on your predefined rules. The right issue gets to the right person without anyone having to manually create it.
Allow AI to Create Private Notes: Your AI drops internal notes into conversations in real time, keeping your team informed and aligned without the customer ever seeing them
There is also AI Training, which, when enabled, learns from how your team responds to customers. Every time a team member replies to a message, your AI picks it up and uses it to improve future responses.
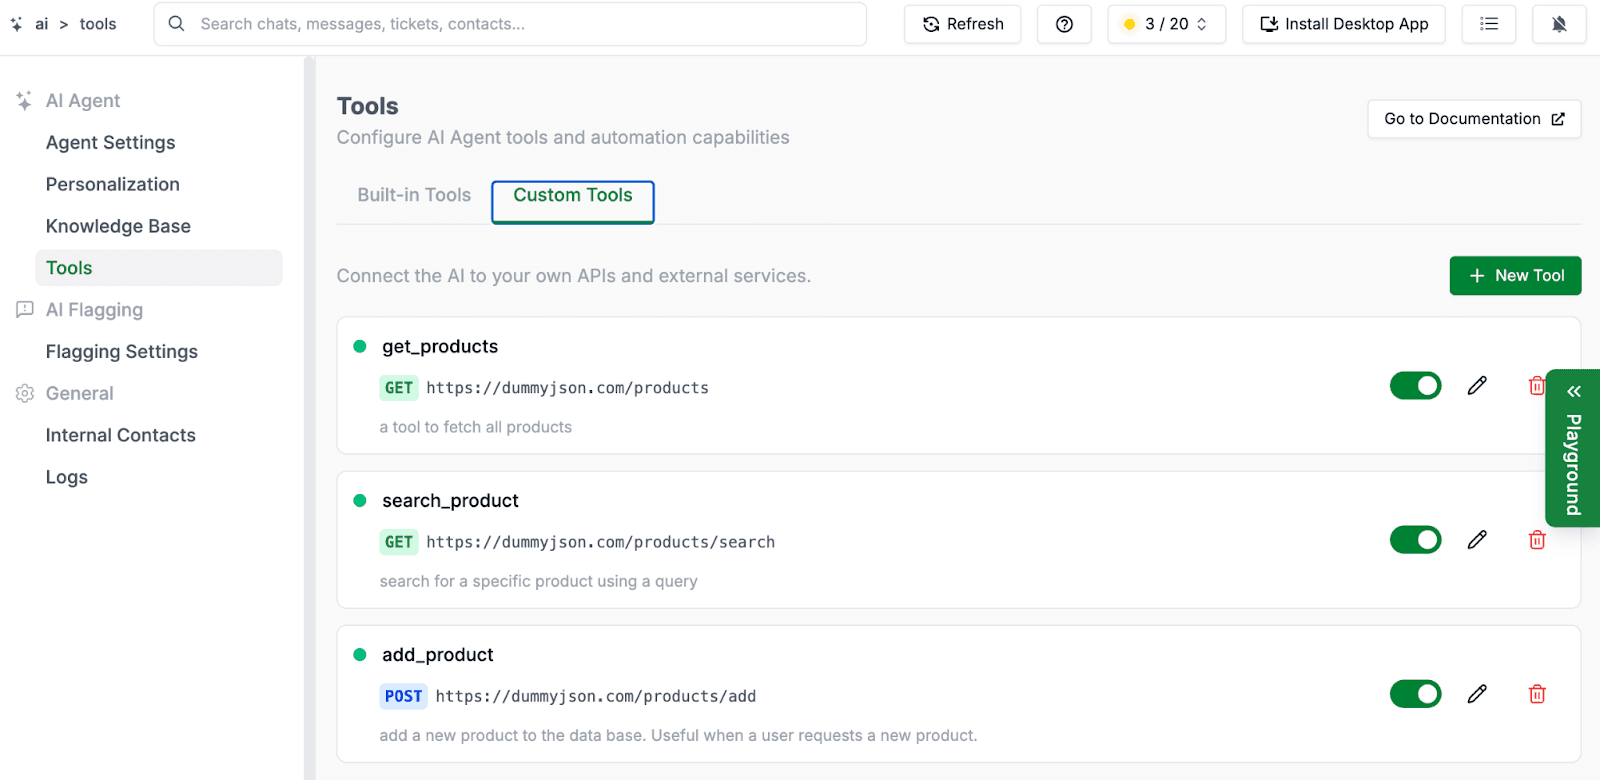
2. Custom Tools: Build Your Own AI-Powered Workflows
Custom Tools let you connect your AI to the systems your business actually runs on.
Your CRM, order management system, support database, inventory, or anything with an API. Once connected, your AI doesn't just respond, it looks things up, takes action, and closes the loop, all within the conversation.
For sales teams, that means your AI can pull up a lead's full history the moment they message in.
For support teams, it means ticket status, order updates, and trial extensions handled automatically.
For operations teams, it means your AI can keep your systems in sync, all from within a WhatsApp conversation.
Here’s how you can create one:
Let’s walk through a simple example. Say a customer asks where their order is. Instead of your team checking the order system manually, your AI can fetch the live status and reply instantly. This is how you'd set that up.
📌 Step 1 - Name your tool and describe what it does: Go to AI > Tools > Custom Tools and click New Tool.
Give your tool a name in lowercase with underscores. In this case: get_order_status
Write a clear description so your AI knows exactly when to use it: "Fetch the live status of a customer's order from the order management system. Use when a customer asks where their order is, when it will be delivered, or for any order update."
The description helps your AI understand when it should use this tool in a conversation. Be specific about the situations where it should run.
📌 Step 2 - Set your HTTP method and endpoint URL: Choose your HTTP method and enter the endpoint URL.
Use GET when your AI is only fetching data, for example, retrieving an order status or checking stock availability.
Use POST when your AI needs to send data to trigger an action, for example, creating a record, extending a trial, or sending an alert.
In this case, since we're fetching order data, use: GET, https://api.yourstore.com/orders/status
📌 Step 3 - Configure authentication: Decide how your AI will authenticate requests. Options include No Auth, Bearer Token, API Key, and Basic Auth. Choose the option that matches how your system is set up.
For reference, most modern APIs use one of these:
Bearer Token - your system issues a token, paste it here and it's sent with every request
API Key - a unique key your system provides, sent as a header or parameter
Basic Auth - a username and password combination
📌 Step 4 - Add parameters: Define what your AI will pass when calling the tool. For this example, add order_id as a required parameter. Your AI will automatically pass the order ID from the conversation when it calls the tool.
For reference, parameters typically look like this:
order_id (String, Required) - the ID of the order to fetch status for
customer_phone (String, Optional) - the customer's phone number for verification
📌 Step 5 - Response Schema (optional): Describe the shape of your endpoint's response so your AI can interpret the results accurately.
Save your tool and toggle it on. Your AI now fetches live order data and responds with the exact status, estimated delivery date, and any relevant updates, without anyone getting involved.
Similarly, you can build custom tools for:
Checking product availability from your inventory in real time
Sending a high-priority Slack alert when a frustrated customer messages in
Extending a customer's trial directly from the conversation
Pulling CRM data when a lead messages in, so your sales team has full context
Updating records in your system based on what a customer tells your AI
3. AI Logs: See Everything Your AI Did
Once your AI is live and using tools, you want to know exactly what it's doing. The AI Logs screen gives you complete visibility into every session.
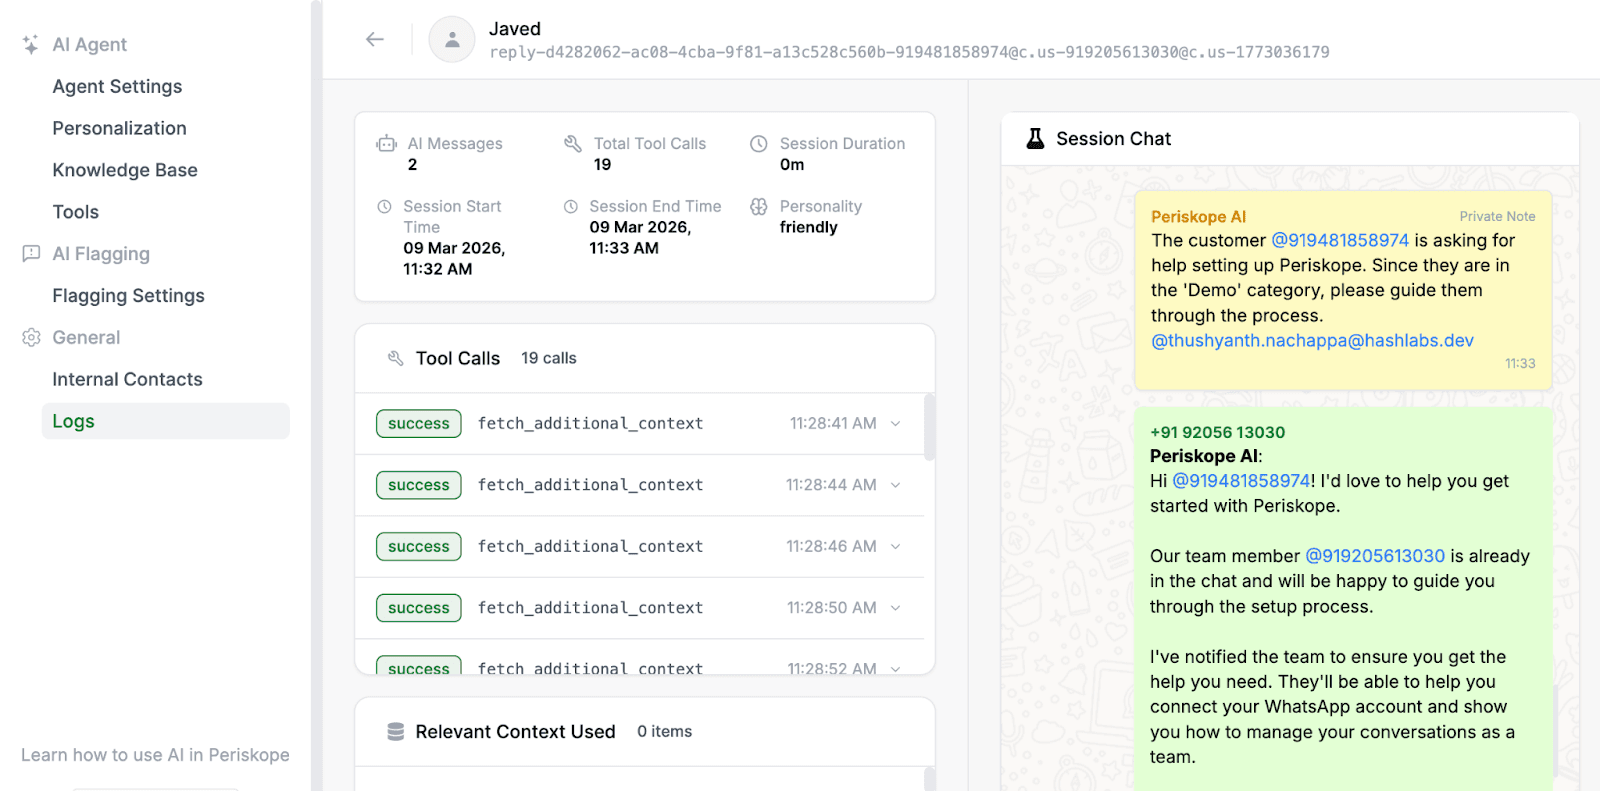
You can see:
Tool Calls: Every tool called, whether built-in or custom, with timestamps and success status
Arguments Passed: Exactly what your AI sent when calling each tool, the chat ID, org ID, priority level, and more
Context Used: Which knowledge base items your AI pulled from and how closely they matched
Full Session Chat: The complete conversation your AI was part of, from start to finish
If a response ever looks off or a tool call didn't behave as expected, you'll know exactly where to look and why it happened.
Your AI can now do a lot more than reply. Log in and see what it can handle for your business.
—--
That's everything for Day 4. Tomorrow we're covering the intelligence side of your WhatsApp AI Agent, how it learns from your team, gets smarter over time, and handles conversations in any language. Stay tuned.
It’s Day 4 of Periskope Launch Week, and today we're rolling out one of the most requested AI updates yet.
→ Control what your AI does, connect it to your own tools and data, and see exactly what it's doing in real time.
With this update, your AI Agent can take action, fetch live data from your CRM, your order system, your support database, and do things on your behalf, automatically, without your team having to step in.
✅ Built-in Tools that let you control exactly how your AI operates in conversations
✅ Custom Tools that let you connect your AI to your own APIs, databases, and external services
✅ AI Logs so you always know exactly what your AI did, what it called, and why
1. Built-in Tools: Choose How Your AI Operates
Every team works differently. Some want their AI responding to customers. Others want their AI to create tickets or drop private notes without it ever responding to customers.
Now you can set it up exactly the way your team operates. Head to AI > Tools > Built-in Tools to configure these.
Allow AI to Send Messages: Turn this on, and your AI responds to customers directly. Turn it off and your AI works silently in the background, handling everything behind the scenes while your team manages the conversation.
Allow AI to Create Tickets: Your AI raises and routes tickets automatically based on your predefined rules. The right issue gets to the right person without anyone having to manually create it.
Allow AI to Create Private Notes: Your AI drops internal notes into conversations in real time, keeping your team informed and aligned without the customer ever seeing them
There is also AI Training, which, when enabled, learns from how your team responds to customers. Every time a team member replies to a message, your AI picks it up and uses it to improve future responses.
2. Custom Tools: Build Your Own AI-Powered Workflows
Custom Tools let you connect your AI to the systems your business actually runs on.
Your CRM, order management system, support database, inventory, or anything with an API. Once connected, your AI doesn't just respond, it looks things up, takes action, and closes the loop, all within the conversation.
For sales teams, that means your AI can pull up a lead's full history the moment they message in.
For support teams, it means ticket status, order updates, and trial extensions handled automatically.
For operations teams, it means your AI can keep your systems in sync, all from within a WhatsApp conversation.
Here’s how you can create one:
Let’s walk through a simple example. Say a customer asks where their order is. Instead of your team checking the order system manually, your AI can fetch the live status and reply instantly. This is how you'd set that up.
📌 Step 1 - Name your tool and describe what it does: Go to AI > Tools > Custom Tools and click New Tool.
Give your tool a name in lowercase with underscores. In this case: get_order_status
Write a clear description so your AI knows exactly when to use it: "Fetch the live status of a customer's order from the order management system. Use when a customer asks where their order is, when it will be delivered, or for any order update."
The description helps your AI understand when it should use this tool in a conversation. Be specific about the situations where it should run.
📌 Step 2 - Set your HTTP method and endpoint URL: Choose your HTTP method and enter the endpoint URL.
Use GET when your AI is only fetching data, for example, retrieving an order status or checking stock availability.
Use POST when your AI needs to send data to trigger an action, for example, creating a record, extending a trial, or sending an alert.
In this case, since we're fetching order data, use: GET, https://api.yourstore.com/orders/status
📌 Step 3 - Configure authentication: Decide how your AI will authenticate requests. Options include No Auth, Bearer Token, API Key, and Basic Auth. Choose the option that matches how your system is set up.
For reference, most modern APIs use one of these:
Bearer Token - your system issues a token, paste it here and it's sent with every request
API Key - a unique key your system provides, sent as a header or parameter
Basic Auth - a username and password combination
📌 Step 4 - Add parameters: Define what your AI will pass when calling the tool. For this example, add order_id as a required parameter. Your AI will automatically pass the order ID from the conversation when it calls the tool.
For reference, parameters typically look like this:
order_id (String, Required) - the ID of the order to fetch status for
customer_phone (String, Optional) - the customer's phone number for verification
📌 Step 5 - Response Schema (optional): Describe the shape of your endpoint's response so your AI can interpret the results accurately.
Save your tool and toggle it on. Your AI now fetches live order data and responds with the exact status, estimated delivery date, and any relevant updates, without anyone getting involved.
Similarly, you can build custom tools for:
Checking product availability from your inventory in real time
Sending a high-priority Slack alert when a frustrated customer messages in
Extending a customer's trial directly from the conversation
Pulling CRM data when a lead messages in, so your sales team has full context
Updating records in your system based on what a customer tells your AI
3. AI Logs: See Everything Your AI Did
Once your AI is live and using tools, you want to know exactly what it's doing. The AI Logs screen gives you complete visibility into every session.
You can see:
Tool Calls: Every tool called, whether built-in or custom, with timestamps and success status
Arguments Passed: Exactly what your AI sent when calling each tool, the chat ID, org ID, priority level, and more
Context Used: Which knowledge base items your AI pulled from and how closely they matched
Full Session Chat: The complete conversation your AI was part of, from start to finish
If a response ever looks off or a tool call didn't behave as expected, you'll know exactly where to look and why it happened.
Your AI can now do a lot more than reply. Log in and see what it can handle for your business.
—--
That's everything for Day 4. Tomorrow we're covering the intelligence side of your WhatsApp AI Agent, how it learns from your team, gets smarter over time, and handles conversations in any language. Stay tuned.
Try Periskope
Manage WhatsApp Groups, Chats and Numbers at Scale
Automate your WhatsApp with Periskope
Automate your WhatsApp with Periskope
Automate your WhatsApp with Periskope

Supercharge your WhatsApp with a powerful CRM, workflow automation and integrations
Periskope uses Google Gemini models to power AI features. Read more >
© 2026 Hashlabs Holdings Inc
Features
Integrations
Supercharge your WhatsApp with a powerful CRM, workflow automation and integrations
Periskope uses Google Gemini models to power AI features. Read more >
© 2026 Hashlabs Holdings Inc
Features
Integrations
Supercharge your WhatsApp with a powerful CRM, workflow automation and integrations
Periskope uses Google Gemini models to power AI features. Read more >
© 2026 Hashlabs Holdings Inc
Features
Integrations